Re: Itus Networks Shield Firmware v2 Released
Posted by Grommish on Jul 14, 2020; 5:51am
URL: https://itus.accessinnov.com/Itus-Networks-Shield-Firmware-v2-Released-tp2084p2085.html
Edited 7/25/2020: See Notes in First Post - Updated links.
Now it is time to decide which slot you want to use first.
There is NO practical difference between the modes, with the exception of the (M)ode light. ROUTER is Dark Blue and Bridge is Orange (where-as the Recovery is Cyan).
After that, they are exactly the same, so it's really a choice of aesthetics.
openwrt-octeon-itus_shield-bridge-initramfs-kernel.bin
openwrt-octeon-itus_shield-router-initramfs-kernel.bin
Install the image to /mnt (see first post) to their respective names (ItusbridgeImage and ItusrouterImage) and unmount /mnt
Switch to the mode you selected, and reboot (reboot -f is not needed, simple reboot works..)
System will boot, the (M)ode light will indicate boot complete.
Looks familiar? It's exactly the same as the Recovery image. Same rules apply, but we can fix that..
Download the sysupgrade file below for the Mode your targeting.
openwrt-octeon-itus_shield-bridge-squashfs-sysupgrade.tar
openwrt-octeon-itus_shield-router-squashfs-sysupgrade.tar
(Additionally, you can run the sysupgrade flie for the gateway mode (found in the repo), which will turn your gateway slot from a emergency recovery to full-storage image. I would recommend leaving it as the recovery image unless you have need of additional slots)
You need to ssh/console to the Shield, and run the following command (depending on your mode selection!)
This WILL DESTROY your DATA!
ROUTER:
mkfs.f2fs /dev/mmcblk1p2
BRIDGE:
mkfs.f2fs /dev/mmcblk1p4
(Gateway: If you choose to utilize the Gateway slot as a proper slot: mkfs.f2fs /dev/mmcblk1p3)
Log into luCi (192.168.1.1), go to System | Backup / Flash Firmware.
Scroll to the Bottom:
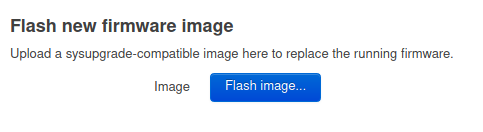
Upload the sysupgrade file for the Mode you are in (Router vs Bridge).
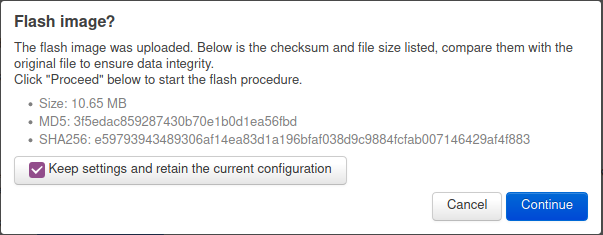
Click Continue and wait for it to reboot and restart (Watch the (M)ode light!).
Once it is booted, you have successfully installed your new Itus Networks v2 firmware with perm. storage on the Flash-Friendly File System (f2fs). Technical Geek note: If you have a console cable, you'll notice I now manage to pass proper kernel cmd lines and we don't have any of the waiting for root bunk anymore...
Once again, log into luCi (192.168.1.1) and change the Password (and install your ssh key, if you use one). Change your Network settings to what you need it to be if 192.168.1.1 will not work in your environment.
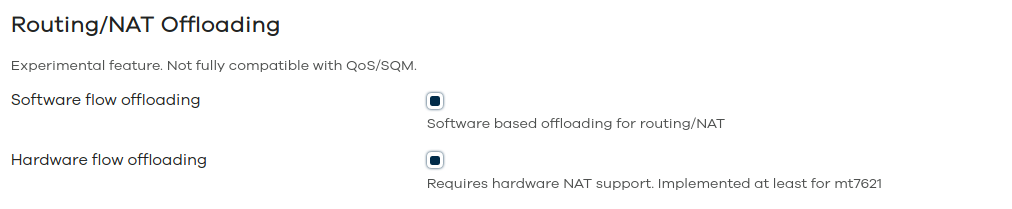
There is a setting that needs to be set In Network | Firewall. Turn ON both Software and Hardware Packet Offloading..
Next: Package installation
URL: https://itus.accessinnov.com/Itus-Networks-Shield-Firmware-v2-Released-tp2084p2085.html
Edited 7/25/2020: See Notes in First Post - Updated links.
Now it is time to decide which slot you want to use first.
There is NO practical difference between the modes, with the exception of the (M)ode light. ROUTER is Dark Blue and Bridge is Orange (where-as the Recovery is Cyan).
After that, they are exactly the same, so it's really a choice of aesthetics.
openwrt-octeon-itus_shield-bridge-initramfs-kernel.bin
openwrt-octeon-itus_shield-router-initramfs-kernel.bin
Install the image to /mnt (see first post) to their respective names (ItusbridgeImage and ItusrouterImage) and unmount /mnt
Switch to the mode you selected, and reboot (reboot -f is not needed, simple reboot works..)
System will boot, the (M)ode light will indicate boot complete.
Looks familiar? It's exactly the same as the Recovery image. Same rules apply, but we can fix that..
Download the sysupgrade file below for the Mode your targeting.
openwrt-octeon-itus_shield-bridge-squashfs-sysupgrade.tar
openwrt-octeon-itus_shield-router-squashfs-sysupgrade.tar
(Additionally, you can run the sysupgrade flie for the gateway mode (found in the repo), which will turn your gateway slot from a emergency recovery to full-storage image. I would recommend leaving it as the recovery image unless you have need of additional slots)
You need to ssh/console to the Shield, and run the following command (depending on your mode selection!)
This WILL DESTROY your DATA!
ROUTER:
mkfs.f2fs /dev/mmcblk1p2
BRIDGE:
mkfs.f2fs /dev/mmcblk1p4
(Gateway: If you choose to utilize the Gateway slot as a proper slot: mkfs.f2fs /dev/mmcblk1p3)
Log into luCi (192.168.1.1), go to System | Backup / Flash Firmware.
Scroll to the Bottom:
Upload the sysupgrade file for the Mode you are in (Router vs Bridge).
Click Continue and wait for it to reboot and restart (Watch the (M)ode light!).
Once it is booted, you have successfully installed your new Itus Networks v2 firmware with perm. storage on the Flash-Friendly File System (f2fs). Technical Geek note: If you have a console cable, you'll notice I now manage to pass proper kernel cmd lines and we don't have any of the waiting for root bunk anymore...
Once again, log into luCi (192.168.1.1) and change the Password (and install your ssh key, if you use one). Change your Network settings to what you need it to be if 192.168.1.1 will not work in your environment.
There is a setting that needs to be set In Network | Firewall. Turn ON both Software and Hardware Packet Offloading..
Next: Package installation
Running Itus Shield v2 Firmware
| Free forum by Nabble | Edit this page |