BRIDGE mode ONLY!!!
There is a ton of good posts in this forum, I'm extremely thankful to the kind and talented individuals who contribute to keeping our shields alive and kicking. For a while now I've wanted to apply the hotfixes and updates but been confused by all the posts.
Then I came accross the
recovery guide by harpss1ngh which explains how to unbrick and update your Shield and this summarised the process nicely. I don't mean to simply double up on his tutorial, I just thought I'd condense it to help those that are on 1.51 SP1 and don't really know where to start.
So, in my case my Shield was already updated to SP1 so that was my starting point:
Connect to the Shield, I used a console cable but your can connect over SSH if you like. There's a dedicated console cable turorial but to summarise, in Putty, select Serial and enter the COM port (you can find it via device manager > Ports), then enter 115200 for speed, press enter to get to the prompt and then:
Install these two hotfixes:
root@Itus# cd /
root@Itus:/# wget
http://itus.accessinnov.com/file/n8/hotfix_160210.tgzroot@Itus:/# tar -zxvf hotfix_160210.tgz
root@Itus:/# reboot -f
root@Itus# cd /
root@Itus:/# wget
http://itus.accessinnov.com/file/n157/hotfix_160309-FINAL.tgzroot@Itus:/# tar -zxvf hotfix_160309-FINAL.tgz
root@Itus:/# reboot -f
Now install the latest fw_upgrade script (v8.3.1) which have been updated with the latest files downloaded from Github 23/05/2016:
root@Itus# cd /tmp
root@Itus:/tmp# wget
http://itus.accessinnov.com/file/n896/dnsmasq.dnsmasqroot@Itus:/tmp# wget
http://itus.accessinnov.com/file/n896/e2guardian.luaroot@Itus:/tmp# wget
http://itus.accessinnov.com/file/n931/fw_upgrade.fw_upgraderoot@Itus:/tmp# wget
http://itus.accessinnov.com/file/n931/index.htmroot@Itus:/tmp# wget
http://itus.accessinnov.com/file/n931/install_fw_upgrade_8_3_1.shroot@Itus:/tmp# wget
http://itus.accessinnov.com/file/n896/write-categories.shroot@Itus:/tmp# mv dnsmasq.dnsmasq dnsmasq
root@Itus:/tmp# mv fw_upgrade.fw_upgrade fw_upgrade
Then run:
root@Itus:/tmp# sh /tmp/install_fw_upgrade_8_3_1.sh
Then run fw_upgrade 3 times to make sure snort is properly updated. Wait a few minutes after each one to allow the services to come back up otherwise you may get issues:
root@Itus:/tmp# sh /sbin/fw_upgrade
(wait 2 mins)
root@Itus:/tmp# sh /sbin/fw_upgrade
(wait 2 mins)
root@Itus:/tmp# sh /sbin/fw_upgrade
root@Itus:/tmp# reboot -f
All done!!! you should now see this in the status screen:
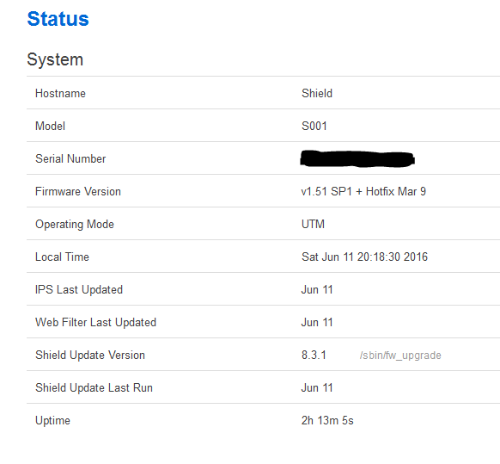
Happy Days, again a HUGE thank you to all the people who contributed to the above magic!
Running v2 Firmware

